ArtsAutosBooksBusinessEducationEntertainmentFamilyFashionFoodGamesGenderHealthHolidaysHomeHubPagesPersonal FinancePetsPoliticsReligionSportsTechnologyTravel

Crochet CRESCENT Clutch Free Pattern

Updated on September 17, 2012
Click thumbnail to view full-size
CRESCENT Clutch photographed empty. The creases are evident on this photo. CRESCENT Clutch photographed with some balls inside.CRESCENT Clutch photographed empty against white background. The creases are evident on this photo.CRESCENT Clutch photographed with a lot of stuff inside. CRESCENT Clutch photographed from another angle with a lot of stuff inside.
CRESCENT Clutch photographed empty. The creases are evident on this photo.
CRESCENT Clutch photographed empty. The creases are evident on this photo. | Source
CRESCENT Clutch photographed with some balls inside.
CRESCENT Clutch photographed empty against white background. The creases are evident on this photo.
CRESCENT Clutch photographed with a lot of stuff inside.
CRESCENT Clutch photographed from another angle with a lot of stuff inside.
CRESCENT Clutch photographed from another angle with a lot of stuff inside. | Source

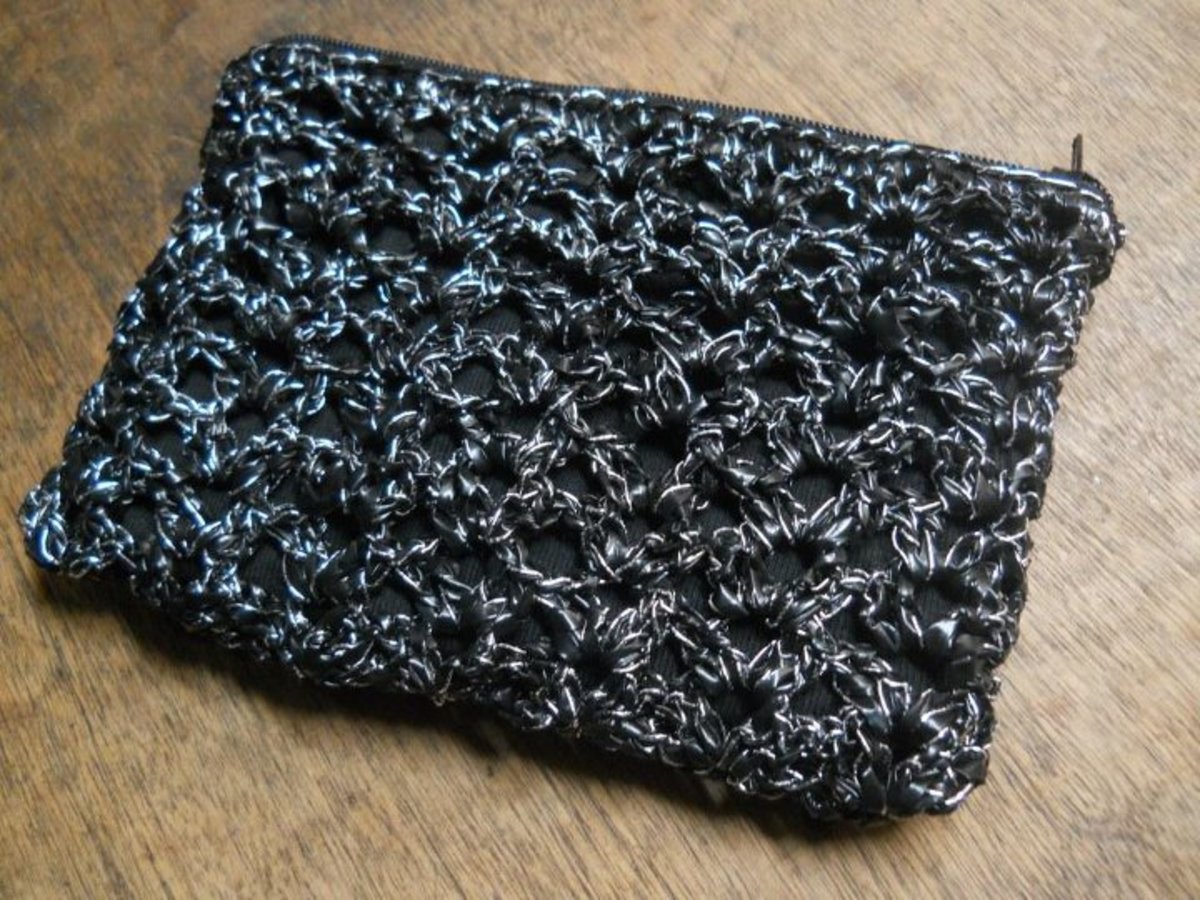
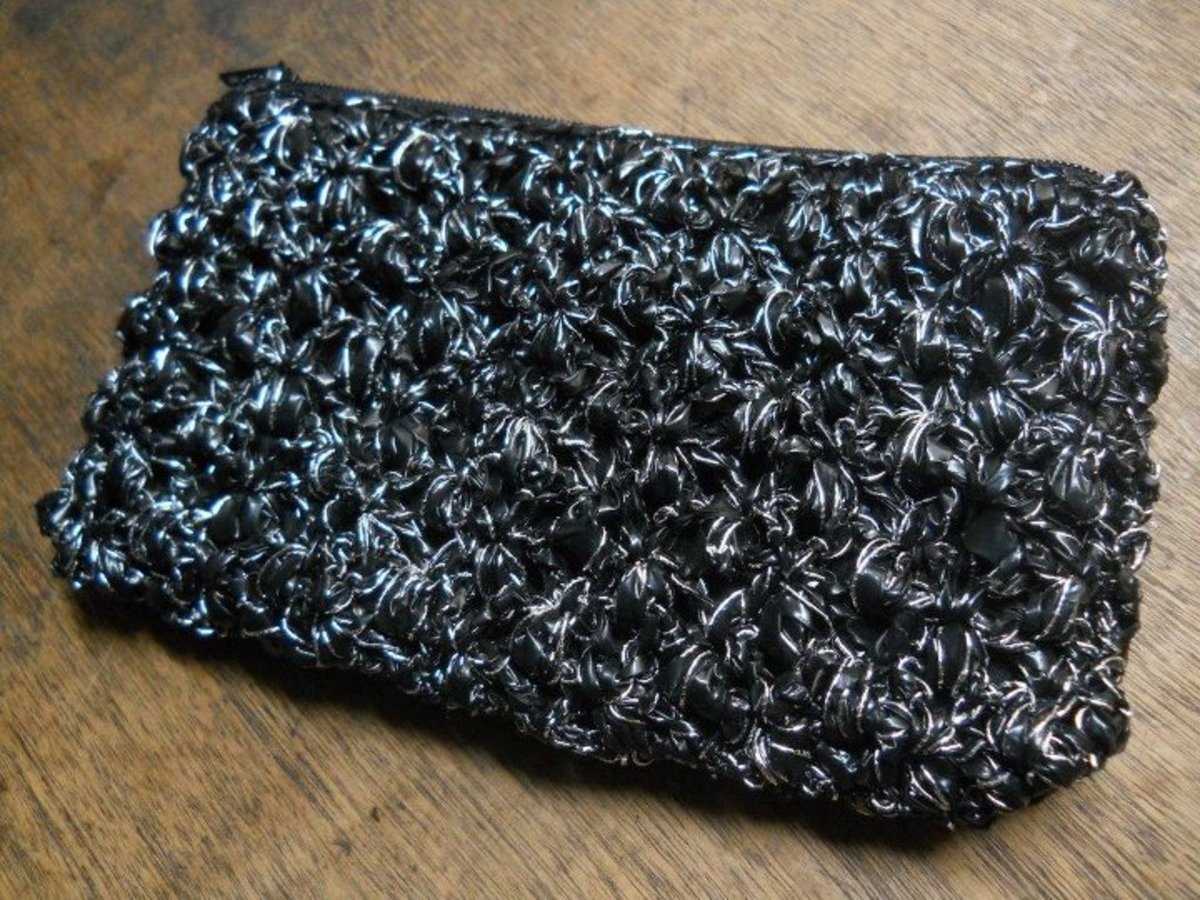
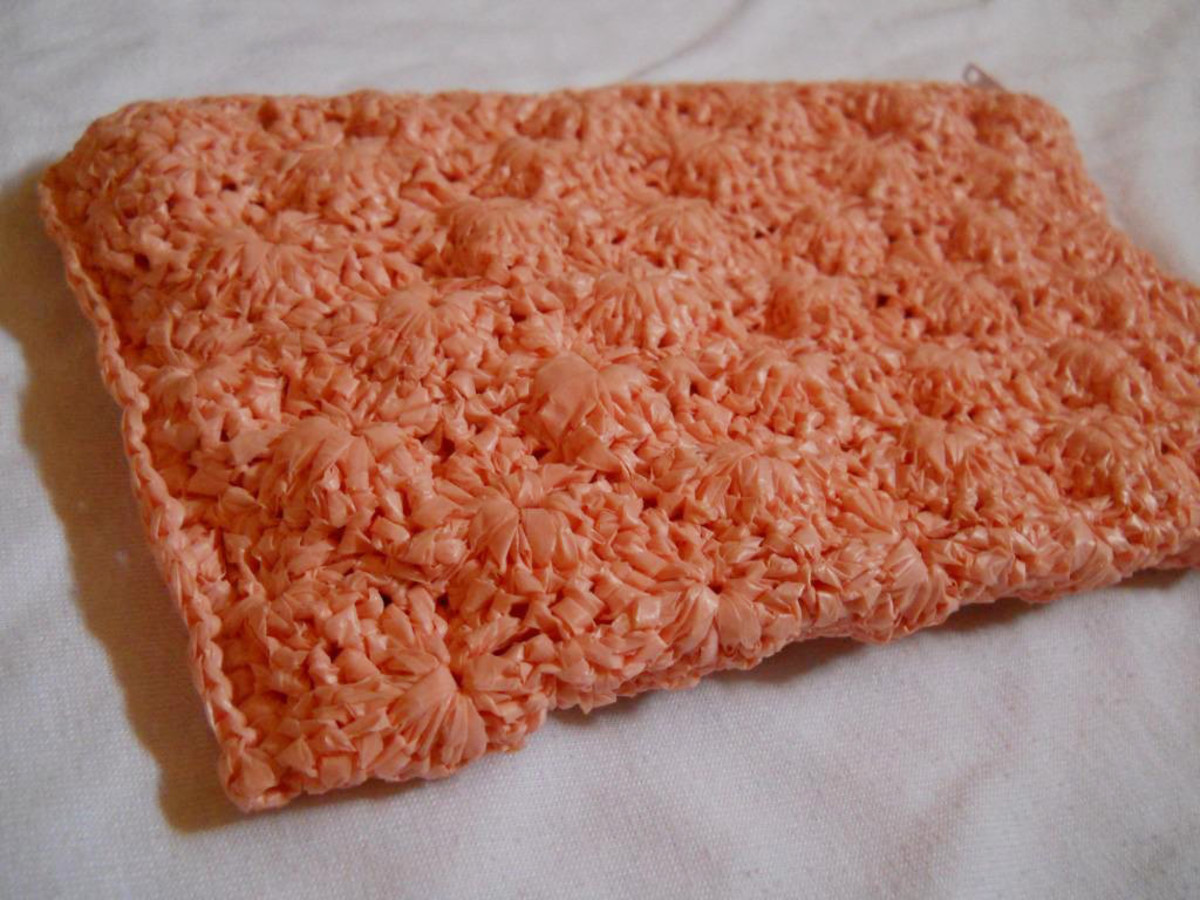
When I finished crocheting this clutch, I had some apprehensions whether I can actually make use of it. It didn’t quite turn out as I had imagined it. There were so many stitches in the 8th to 11th rounds that the clutch creases on these parts. However, as time passed by, I realized that the creases brought more character to the clutch that I would not want to do it any other way anymore.

I’m not sure what got into me. Right after I made the BOXY Pouch, I had the sudden urge to make a semi-circle clutch using mostly bullion stitches. And I used plarn from 3 extra-extra large shopping bags for this clutch. Bullion stitch is already a challenge with traditional yarn, more so with plarn. But I guess adrenaline flowed in my blood during those times because I finished this in just two days.

Whenever I look at this clutch, I can’t believe I really made it. It’s my biggest FO so far. Check out all my patterns for evidence.

If you are interested to work with plastic bags like myself, I wrote an article about the methods of making plarn and conditioning plarn for knit/crochet.


My Free Pouch Patterns

Click thumbnail to view full-size
A beautiful pouch which uses the lovely crocodile stitch A lovely pouch which is crocheted using the Ripple stitch pattern A simple pouch making use of the crab stitch (reverse single crochet) as emphasis A structural pouch that uses broomstick lace to create interest and ridges in the pattern A beautiful pouch which uses the Bushy stitch pattern adorned with Dr. Jeckyll's Flower
A beautiful pouch which uses the lovely crocodile stitch
A beautiful pouch which uses the lovely crocodile stitch | Source
A lovely pouch which is crocheted using the Ripple stitch pattern
A lovely pouch which is crocheted using the Ripple stitch pattern | Source
A simple pouch making use of the crab stitch (reverse single crochet) as emphasis
A simple pouch making use of the crab stitch (reverse single crochet) as emphasis | Source
Source
A structural pouch that uses broomstick lace to create interest and ridges in the pattern
A structural pouch that uses broomstick lace to create interest and ridges in the pattern | Source
A beautiful pouch which uses the Bushy stitch pattern adorned with Dr. Jeckyll's Flower
A beautiful pouch which uses the Bushy stitch pattern adorned with Dr. Jeckyll's Flower | Source
Source
Source

Skill Level

The use of bullion stitches makes this pattern a bit difficult.

Abbreviations

  • Ch - Chain
  • Sl st - Slip stitch
  • St/sts - Stitch/Stitches
  • Sc - Single Crochet


Measurements and Gauge

Width: 12 in

Length: 6 in

Gauge: 5 sts/inch, 7 sts/inch on the creases


Materials and Tools

Materials

  • Yarn
  • 12-in Zipper
  • Cloth

Tools

  • Hook suitable to chosen yarn
  • Sewing pins and needle
  • Sewing thread
  • Tapestry needle
  • Plastic tubing (optional)

I used 1-cn single-strand plarn from about 3 XXL shopping bags, #3 crochet hook, 12 –in ordinary zipper because there’s no YKK zipper available, and cloth from an old t-shirt.


How I Make My Bullion Stitches

Click thumbnail to view full-size
Figure 1:To demonstrate how to make a bullion stitch, I made this small bullion circle. Green photographs really well for me, so I chose this color instead of the color I used for the clutch.Figure 2:To begin, wrap yarn around hook 8 times and pull it to the widest part of hook called the SHANK. This will make sure that the coils have uniform width and for the coil to take shape.Figure 3: Insert hook in ring (or wherever the pattern say), draw up a loop and pull the loops again towards the SHANK. All this time, put your middle finger on loops on hook to keep them from sliding and losing shape.Figure 4: Yarn over and draw up a loop through all loops on hook. Use your thumb and middle finger to hold the loops as you gently pull up a loop through the coils.Figure 5: Secure the coil with a chain stitch. Notice that the chain must be as tall as the bullion stitch so that it will stand straight. Now this represents one bullion stitch.Figure 6: This is what I mean when this pattern calls for a stitch to be worked on top of a bullion stitch.Figure 7: This is what I mean when this pattern calls for a stitch to be worked in between bullion stitches.
Figure 1:To demonstrate how to make a bullion stitch, I made this small bullion circle. Green photographs really well for me, so I chose this color instead of the color I used for the clutch.
Figure 2:To begin, wrap yarn around hook 8 times and pull it to the widest part of hook called the SHANK. This will make sure that the coils have uniform width and for the coil to take shape.
Figure 3: Insert hook in ring (or wherever the pattern say), draw up a loop and pull the loops again towards the SHANK. All this time, put your middle finger on loops on hook to keep them from sliding and losing shape.
Figure 4: Yarn over and draw up a loop through all loops on hook. Use your thumb and middle finger to hold the loops as you gently pull up a loop through the coils.
Figure 5: Secure the coil with a chain stitch. Notice that the chain must be as tall as the bullion stitch so that it will stand straight. Now this represents one bullion stitch.
Figure 6: This is what I mean when this pattern calls for a stitch to be worked on top of a bullion stitch.
Figure 7: This is what I mean when this pattern calls for a stitch to be worked in between bullion stitches.

Crocheting Bullion Stitch with Help

What is the Bullion Stitch

The bullion stitch or roll stitch is an advanced crochet stitch which consists of coils of wraps around the hook through which the yarn is drawn.This coil is then capped off with a chain that secures the coils.

It is quite difficult to make, especially if you think that it is. I learned this stitch by practicing it with just 3 wraps. Once I got comfortable with it, I moved on to 4 wraps, then 5 wraps, 6 wraps, 7 and 8. Now I can do any number of wraps. Figures 1-7 explains the technique I've developed in making bullion stitches. It requires the use of middle fingers and thumbs.

The first video shows roughly how I do my bullion stitches. But if you're having difficulty, watch the next video. It shows two contraptions you can use to crochet the bullion stitch easier.

The bullion stitches used in this pattern use 8 wraps.


Crochet Instructions:

Ch 3, sl st to from ring. Ch 3, turn.

Round 1: 13 bullion st in ring, sl st to top of ch-3.

Round 2: (1 bullion st on top of previous bullion st, 1 bullion st in between bullion sts) repeat all around, sl st to top of ch-3. Ch 1, turn.

Round 3: (Sc on top of previous bullion st, sc in between bullion sts) repeat all around, sl st to 1st sc. Ch 3, turn.

Round 4: 1 bullion st on each sc, sl st to top of ch-3. Ch 1, turn.

Round 5-6: Sc all around, sl st to 1st sc. Ch 1, turn.

Round 7: Sc all around, sl st to 1st sc. Ch 3, turn.

Round 8-10: 1 bullion st all around, sl st to top of ch-3. Ch 3, turn.

Round 11: 1 bullion st all around, sl st to top of ch-3. Ch 1, turn.

Round 12: [(Sc on top of each bullion st) 13x, sc in between bullion sts] repeat all around, sl st to 1st sc. Ch 3, turn.

Round 13: 1 bullion st on each sc, sl st to top of ch-3. Ch 1, turn.

Round 14: [(Sc on top of each bullion st) 7x, sc in between bullion sts] repeat all around, sl st to 1st sc. Ch 3, turn.

Round 15: 1 bullion st on each sc, sl st to top of ch-3. Ch 1, turn.

Round 16: [(Sc on top of each bullion st) 8x, sc in between bullion sts] repeat all around, sl st to 1st sc. Ch 3, turn.

Round 17: 1 bullion st on each sc, sl st to top of ch-3. Ch 1, turn.

Round 18: [(Sc on top of each bullion st) 9x, sc in between bullion sts] repeat all around, sl st to 1st sc. Ch 3, turn.

Round 19: 1 bullion st on each sc, sl st to top of ch-3. Ch 1, turn.

Round 20-21: Sc on each sl, sl st to 1st sc. Ch 1, turn.

Break off. Fold the crocheted circle in half.

[Attach yarn to one end of the semi-circle. Join the sides with 10 sc’s, turn, 10 sl sts on the sc’s. Break off.] Repeat [ ] on the other side. Weave in ends.


Click thumbnail to view full-size
Attach the zipper to the crocheted clutch using back stitches on the 2nd to the last round.Trace the shape of the clutch onto a piece of cloth using a ball pen. The use of ball pen to make markings on cloth is not recommended but I like it because it makes an accurate line and won't smudge as I sew.Stitch the sides using back stitch. For the part near the zipper, use running stitches. Unravel a portion of the running stitches and pin the curved folds in place.Then stitch the curved folds in.Place the lining inside the clutch and turn it inside out.Pin the lining in place.Stitch the lining to the zipper. And you're done!
Attach the zipper to the crocheted clutch using back stitches on the 2nd to the last round.
Trace the shape of the clutch onto a piece of cloth using a ball pen. The use of ball pen to make markings on cloth is not recommended but I like it because it makes an accurate line and won't smudge as I sew.
Stitch the sides using back stitch. For the part near the zipper, use running stitches. Unravel a portion of the running stitches and pin the curved folds in place.
Then stitch the curved folds in.
Place the lining inside the clutch and turn it inside out.
Pin the lining in place.
Stitch the lining to the zipper. And you're done!

Finishing

In lining this clutch, I still the tutorial by Carrie Wolf. This is the most challenging to line because of its shape.


If you like my pattern please click the +1 button to help improve this pattern's Google Ranking. Better yet, click the "Like" or "Tweet" button. Thanks a lot for your help and appreciation.
working

This website uses cookies

As a user in the EEA, your approval is needed on a few things. To provide a better website experience, hubpages.com uses cookies (and other similar technologies) and may collect, process, and share personal data. Please choose which areas of our service you consent to our doing so.

For more information on managing or withdrawing consents and how we handle data, visit our Privacy Policy at: https://corp.maven.io/privacy-policy

Show Details
Necessary
HubPages Device IDThis is used to identify particular browsers or devices when the access the service, and is used for security reasons.
LoginThis is necessary to sign in to the HubPages Service.
Google RecaptchaThis is used to prevent bots and spam. (Privacy Policy)
AkismetThis is used to detect comment spam. (Privacy Policy)
HubPages Google AnalyticsThis is used to provide data on traffic to our website, all personally identifyable data is anonymized. (Privacy Policy)
HubPages Traffic PixelThis is used to collect data on traffic to articles and other pages on our site. Unless you are signed in to a HubPages account, all personally identifiable information is anonymized.
Amazon Web ServicesThis is a cloud services platform that we used to host our service. (Privacy Policy)
CloudflareThis is a cloud CDN service that we use to efficiently deliver files required for our service to operate such as javascript, cascading style sheets, images, and videos. (Privacy Policy)
Google Hosted LibrariesJavascript software libraries such as jQuery are loaded at endpoints on the googleapis.com or gstatic.com domains, for performance and efficiency reasons. (Privacy Policy)
Features
Google Custom SearchThis is feature allows you to search the site. (Privacy Policy)
Google MapsSome articles have Google Maps embedded in them. (Privacy Policy)
Google ChartsThis is used to display charts and graphs on articles and the author center. (Privacy Policy)
Google AdSense Host APIThis service allows you to sign up for or associate a Google AdSense account with HubPages, so that you can earn money from ads on your articles. No data is shared unless you engage with this feature. (Privacy Policy)
Google YouTubeSome articles have YouTube videos embedded in them. (Privacy Policy)
VimeoSome articles have Vimeo videos embedded in them. (Privacy Policy)
PaypalThis is used for a registered author who enrolls in the HubPages Earnings program and requests to be paid via PayPal. No data is shared with Paypal unless you engage with this feature. (Privacy Policy)
Facebook LoginYou can use this to streamline signing up for, or signing in to your Hubpages account. No data is shared with Facebook unless you engage with this feature. (Privacy Policy)
MavenThis supports the Maven widget and search functionality. (Privacy Policy)
Marketing
Google AdSenseThis is an ad network. (Privacy Policy)
Google DoubleClickGoogle provides ad serving technology and runs an ad network. (Privacy Policy)
Index ExchangeThis is an ad network. (Privacy Policy)
SovrnThis is an ad network. (Privacy Policy)
Facebook AdsThis is an ad network. (Privacy Policy)
Amazon Unified Ad MarketplaceThis is an ad network. (Privacy Policy)
AppNexusThis is an ad network. (Privacy Policy)
OpenxThis is an ad network. (Privacy Policy)
Rubicon ProjectThis is an ad network. (Privacy Policy)
TripleLiftThis is an ad network. (Privacy Policy)
Say MediaWe partner with Say Media to deliver ad campaigns on our sites. (Privacy Policy)
Remarketing PixelsWe may use remarketing pixels from advertising networks such as Google AdWords, Bing Ads, and Facebook in order to advertise the HubPages Service to people that have visited our sites.
Conversion Tracking PixelsWe may use conversion tracking pixels from advertising networks such as Google AdWords, Bing Ads, and Facebook in order to identify when an advertisement has successfully resulted in the desired action, such as signing up for the HubPages Service or publishing an article on the HubPages Service.
Statistics
Author Google AnalyticsThis is used to provide traffic data and reports to the authors of articles on the HubPages Service. (Privacy Policy)
ComscoreComScore is a media measurement and analytics company providing marketing data and analytics to enterprises, media and advertising agencies, and publishers. Non-consent will result in ComScore only processing obfuscated personal data. (Privacy Policy)
Amazon Tracking PixelSome articles display amazon products as part of the Amazon Affiliate program, this pixel provides traffic statistics for those products (Privacy Policy)
ClickscoThis is a data management platform studying reader behavior (Privacy Policy)